Thursday, September 14, 2017

GIT: Merge several commits to one (Rewrite History)

There can be situations where you want to merge several commits into one commit and remove the old commits. So that they will look like only one commit.
Here is how,

  1. Issue following command by replacing n with the number of commits you need to merge together. git rebase -i HEAD~n
  2. You will get a prompt like below. Replace the word "pick" with "squash" on all commits other than the latest one.
  3. Then you will get an editor to add the commit message for the new commit.
  4. Once this is done there will be a new commit that is not pushed to the remote repo.
  5. Force push the commit to the remote with following command.  git push -f remote-repo branch 
Check the git log, you will have only one commit for all those commits.

Saturday, September 2, 2017

Ballerina : Sending a simple message

This is a step by step guide on sending a simple message using ballerina. If you have no idea on Ballerina, go to the ballerinalang.org. You need to setup the ballerina composer as well to follow the guide.

Let’s try a simple scenario where a patient makes an inquiry specifying the doctor's specialization(category) to retrieve a list of doctors that match the specialization. The required information is available in a microservice deployed in the MSF4J profile of WSO2 EI. We will configure an API resource in WSO2 Enterprise Integrator (Ballerina) that will receive the client request, instead of the client sending messages directly to the back-end service, thereby decoupling the client and the back-end service.


Before you begin,
  1. Install Oracle Java SE Development Kit (JDK) version 1.8.* and set the JAVA_HOME environment variable.
  2. Download the WSO2 EI ZIP file from here, and then extract the ZIP file.  
  3. The path to this folder will be referred to as throughout this tutorial.
  4. Download the MSF4J service from here and copy the JAR file to /wso2/msf4j/deployment/microservices folder. The back-end service is now deployed in the MSF4J profile of WSO2 EI.

Creating the Ballerina service

In this section we will create a Ballerina service using the Ballerina Composer to run with the Ballerina runtime that will send the incoming requests to the HealthCare backend service.


  1. Install ballerina if you haven’t already, as explained in Install Ballerina. Now start the ballerina composer by running the command “composer” in command line.
  2. Click on new button of the welcome page to start a new .bal file.
  3. On the tool palette, click the service icon and drag it to the canvas. A new service and resource will be created for you.
  4. Let's rename the service and resource. Highlight the name “Service1” and type “healthcareService” in its place. Change Resource1 to “doctorResource” in the same way.
  5. Let’s set the base path for our service. In the upper right corner of the myEchoService box (not the resource box this time), click the Annotations (@) icon. Make sure http:BasePath is selected in the list, type /healthcare in the text box, and then press Enter or click the + symbol to its right. Now our service is available in http://localhost:9090/healthcareService url.
  6. Now let’s add the rest of the resource path of our service with path params. Click the Annotations (@) icon in the upper right corner of the doctorResource box (not the service box). Select “ballerina.net.http” and then select “path”. Then type “"/queryDoctor/{category}” in the text box of the “value” sub field, and then press Enter or click the + symbol to its right.
  7. We need to pass the “category” path param to the backend. We need to add a new variable to the “doctorResource” method to retrieve this category. Locate the “Add param” text box next to the doctorResource resource name. Add following parameter to retrieve the category path param.
@http:PathParam{value:"category"} string category


  1. Now if you go to the source view of the service, it will look like below.
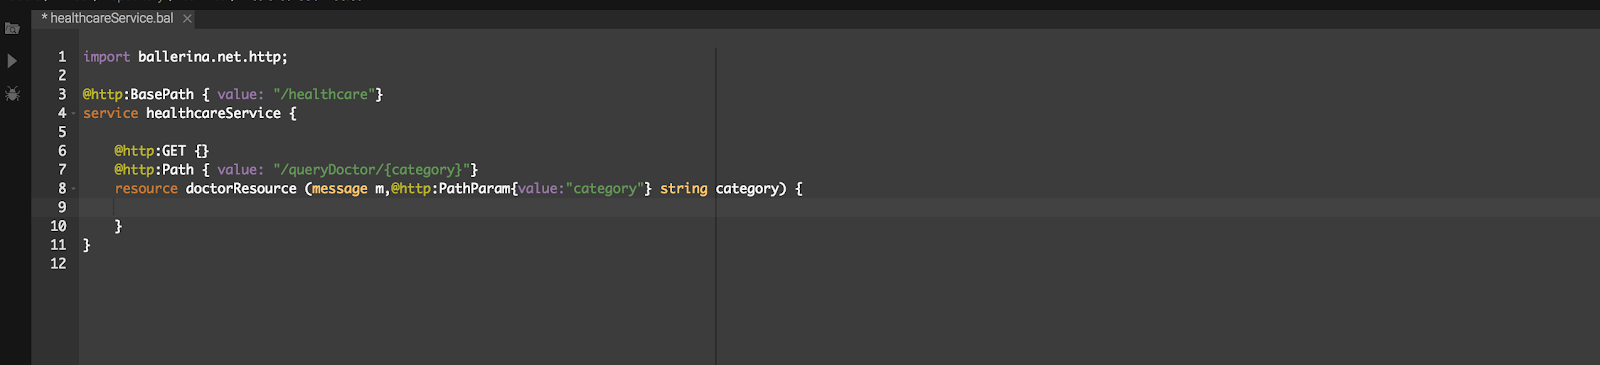
  2. Go to the File > save(ctrl+s) to save the file. Give the name healthcareService.bal.
  3. Go back to the design view and click on the “ballerina.net.http” from the Connectors tab in the tool palette.
  1. Now drag and drop the Client Conenctor into the doctorResource resource box.
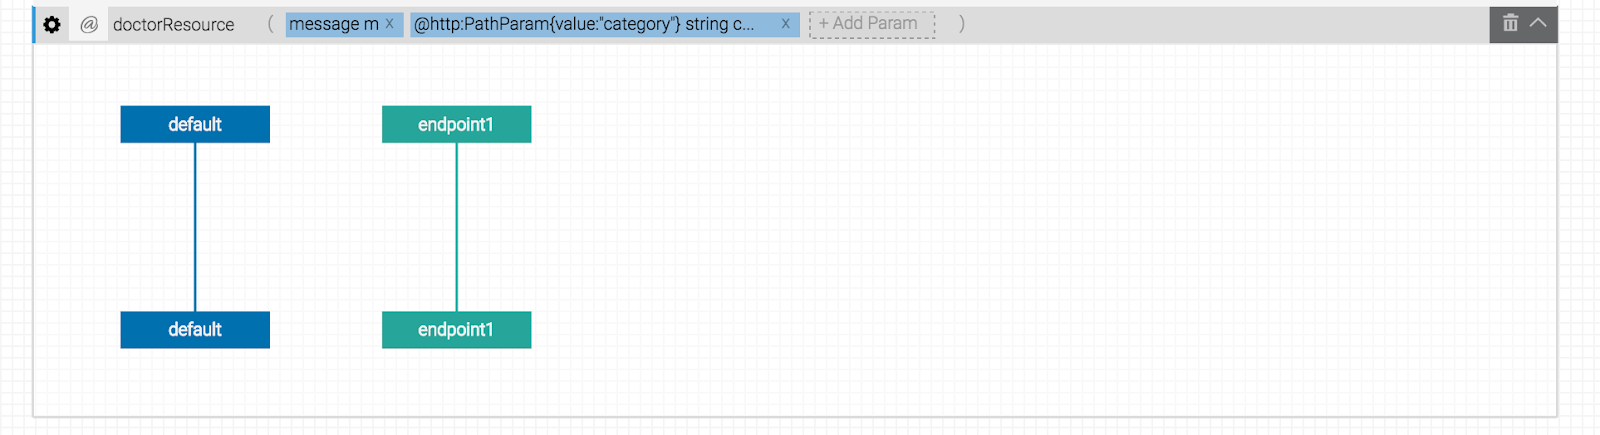
  2. Now click on the string “endpoint1” in the client connector lifeline and edit the client connector. Change “endpoint1” to doctorEP and give “http://localhost:9095” inside the ClientConnector() method as a parameter which is the URL of our Msf4j server.
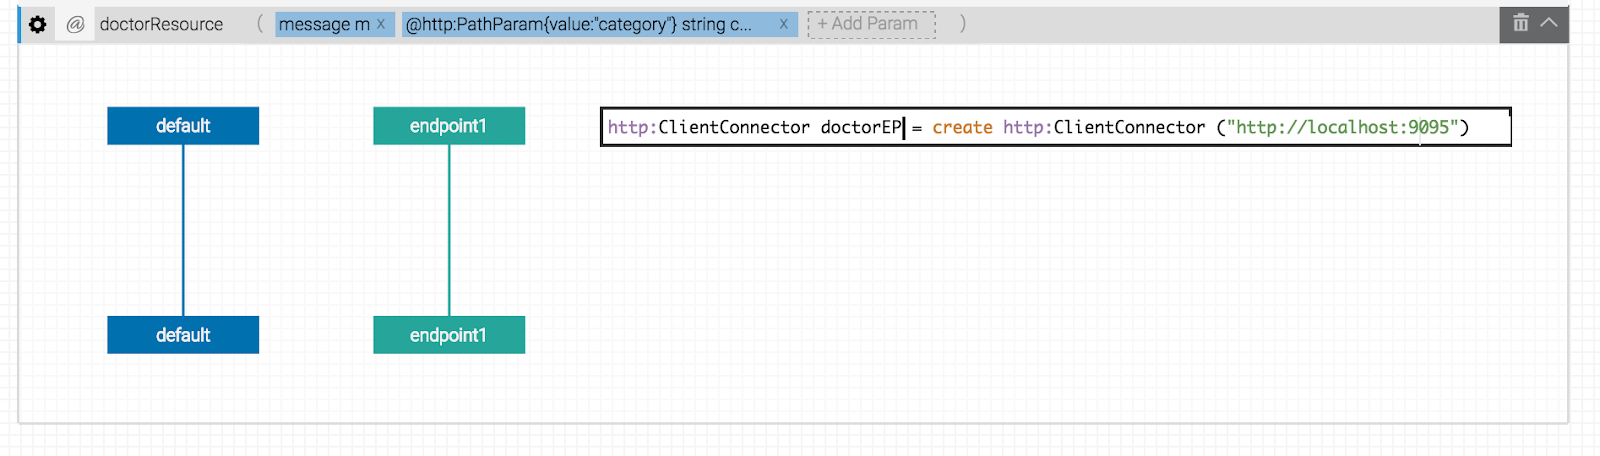
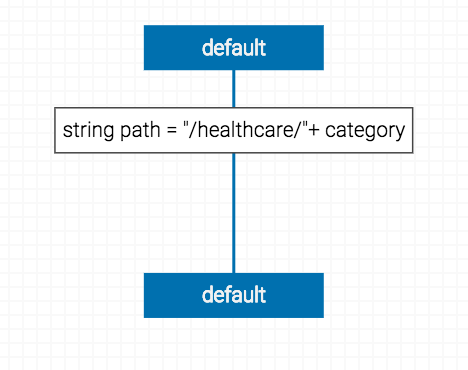
  3. The full URL to the backend service should be http://localhost:9095/healthcare/{category}. Let’s create a variable with this value. Drag a assignment () from the tool palette on to top of the default lifeline. Click on it and change the value to following.
string path = "/healthcare/"+ category
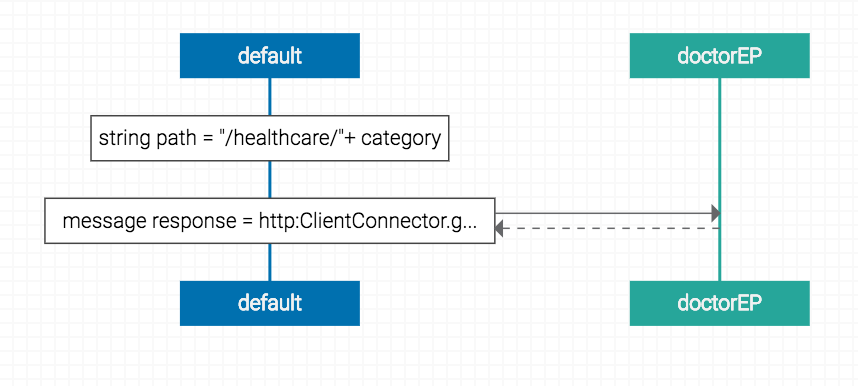
  1. Since we are doing a GET rest call to the backend, drag and drop a get action () from the connector tool palette to the default lifeline. Then draw a flow from get action to doctorEP lifeline. You can start drawing the flow by hovering over the get action and once the cursor changes to a pencil.
  2. Now click on the get action and change it’s content to following,
message response = http:ClientConnector.get(doctorEP, path, m)
  1. Now we have assigned the response from the backend to a “message” type called response. Now drag and drop a reply action() from the main tool palette on to the default lifeline after the get action.
  2. Click on the reply action and type “response” in the box to reply with the same message from the server.
  3. Now the full sequence of our Ballerina service will be look like below.
  4. The source code for the service will be following.

Running the ballerina Service

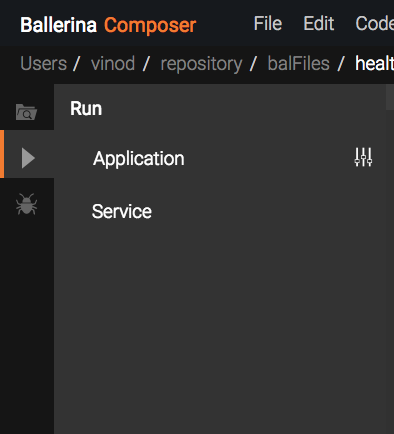
Now we can start our service. You can either use the composer to start the program or ballerina CLI tools.
    • Click on the play button on top right corner and select server to start from the server.
    • If you are using the CLI tools, go to the folder the healthcareService.bal file saved and run following command(You should have added Ballerina bin folder to the PATH variable).
ballerina run service healthCareService.bal


You will get following message in the console after successfully starting the service.

Starting the MSF4J profile

To be able to send requests to the back-end service (which is an MSF4J service deployed in MSF4J profile), you need to first start the MSF4J runtime:
  1. Open a terminal and navigate to the /wso2/msf4j/bin directory.
  2. Since both msf4j and  ballerina is running on port 9090 by default, let’s change the default port of msf4j to be able to run the both in same server machine. Go to the /wso2/msf4j/conf/transports/netty-transports.yml and change the value of the “port” to 9095.
  3. Start the runtime by executing the MSF4J startup script as shown below.
sh carbon.sh
The Healthcare service is now active and you can start sending requests to the service.

Running the sample

Open a command line terminal and enter the following request:
curl -v http://localhost:9090/healthcare/querydoctor/surgery


This is derived from the request path define when creating the API resource.
http://:/healthcare/querydoctor/{category}Other categories you can try sending in the request are:
  • cardiology
  • gynaecology
  • ent
  • paediatric


You will see the response message from HealthcareService with a list of all available doctors and relevant details.


[{"name":"thomas collins",
 "hospital":"grand oak community hospital",
 "category":"surgery",
 "availability":"9.00 a.m - 11.00 a.m",
 "fee":7000.0},
{"name":"anne clement",
 "hospital":"clemency medical center",
 "category":"surgery",
 "availability":"8.00 a.m - 10.00 a.m",
 "fee":12000.0},
{"name":"seth mears",
 "hospital":"pine valley community hospital",
 "category":"surgery",
 "availability":"3.00 p.m - 5.00 p.m",
 "fee":8000.0}

Now we have successfully created a service in ballerina and invoked a microservice in Msf4j. Here the Ballerina HTTP connector is used to invoke the healthcare API.

Monday, August 21, 2017

Disable JavaDoc DocLint from CommandLine

DocLint is a plugin that validates your JavaDoc comments for html tags and several other syntax like missing params etc..
DocLint is enabled by default in Java 8. There can be legacy code that is not compliant with these validations which is hard to fix as well. But when you release such a code base in Java 8 with java doc generation enabled, your release will fail.

This can be done by disabling DocLint while the Maven release using following command.

mvn  -Darguments='-Dadditionalparam=-Xdoclint:none' release:prepare release:perform 

Reference : https://maven.apache.org/plugins/maven-javadoc-plugin/javadoc-mojo.html#doclint

Friday, August 18, 2017

WSO2 ESB - Adding a thread sleep

There can be situations where your ESB logic need thread sleeps to delay the executions. In WSO2 ESB, this can be easily done using the script mediator.

Following is the synapse code of the script mediator to add 1000ms thread sleep.


Feel free to use and share !! 

Friday, June 23, 2017

WSO2 ESB / EI Mediation Latencies with JMX monitoring

WSO2 ESB/EI is equipped with JMX monitoring capabilities. This is explained in WSO2 docs. But with this configurations you can't see advance mediation statistics like mediation level latencies. In order to enable them, add following two entries in the passthru-http.properties file. 

synapse.passthrough.latency_view.enable_advanced_view=true
synapse.passthrough.s2slatency_view.enable_advanced_view=true

Then you can view the time taken in mediation layer (request and response) separately apart from the total latencies.


Cheers!

Friday, June 16, 2017

WSO2 BPS : BPEL Versionning

The versioning of bpel processes is very useful when you need to update a process which is already in production. If you try to undeploy the existing process and deploy the updated process, it will remove all the existing process instances of the previous BPEL package also. Versioning enables updating your processes without affecting existing instances.

BPEL packages(.zip) with same name are eligible for versioning. If two packages with same name are different in content, BPS will retire the existing version and deploy a new version with the new package.
There are three ways you can deploy a BPEL process in BPS. Let's see how versinning works in each of method.

  • Deploying through management console - versioning is supported.
  • Deploying through a carbon application (capp) - versioning not supported.
  • Deploying by copying the package to deployment directory - If you replace the existing package, versioning is supported. But if you remove existing one and later copy the new package, it will un-deploy the old package.


Tuesday, May 23, 2017

WSO2 ESB message flow

This post explains the message flow of the synapse which is the main building block of WSO2 ESB.

Synapse receives the message from the axis2 transport layer. Inside this transport layer, message will be built based on the content type of the message and then passed over to the Synapse. 

Following is the Inflow of the message from the entry point to synapse,


Inside the Axis2FlexibleMEPClient.send() method, a callback is registered in axis2 transport layer and message is dispatched out of the synapse. Then the axis2 transport layer format this message based on the content type and send it to the backend.

When the response is coming from a backend service, transport layer identifies this and synapse response path is invoked.

Following is the synapse response path,


This completes the message flow for the following proxy service configuration.


Monday, May 22, 2017

Processing Binary Data from TCP transport in WSO2 ESB

This post describes how to process binary data over TCP transport in WSO2 ESB.


  • First we need to enable binary transport. Add following entries in ESB_HOME/repository/conf/axis2/axis2.xml. 

  • Now you need to add the message formatters and message builders to be used. Since we are using binary data, add following entry inside messageFormatters element. 
          Add following entry inside messageBuilders element. 

  • Now you can add a tcp proxy service to process the message. In that proxy service you need to add the same content type used in messageFormatter and messageBuilder configs. There are several other parameters specific to TCP proxies. Refer [1] for more info on that. Following is a sample proxy service that prints the binary message. 

  • Now you can invoke this proxy service using a sample TCP client. End of message should be marked with a "|" symbol in this particular proxy service. 

Thursday, March 9, 2017

Installing new features to WSO2 EI

In WSO2 Enterprise Integrator, you cannot install new features via management console. That option has been removed. So in order to install a feature, we must use the POM based feature installation. This is explained in WSO2 docs [1]. There few changes you need to made in order to this POM.xml to work.

  • The "destination" element value should be changed to, "wso2ei-6.0.0/wso2/components".
  • Value of the "dir" attribute in "replace" element should be, "wso2ei-6.0.0/wso2/components/default/configuration/org.eclipse.equinox.simpleconfigurator".
Optionally, Other than downloading p2 repo (which is over 2GB), the URL to P2 repo "http://product-dist.wso2.com/p2/carbon/releases/wilkes/" can be set as "metadataRepository" and "artifactRepository".

Following is a sample pom.xml that is used to install HL7 feature in EI.


[1] - https://docs.wso2.com/display/Carbon440/Installing+Features+using+pom+Files

Tuesday, March 7, 2017

Resolving SSL related issue in WSO2 products for MySql 5.7 upward

If you try to start aWSO2 product with Mysql 5.7 it will give the following warning and the product will not work.

Wed Dec 09 22:46:52 CET 2015 WARN: Establishing SSL connection without server's identity verification is not recommended. According to MySQL 5.5.45+, 5.6.26+ and 5.7.6+ requirements SSL connection must be established by default if explicit option isn't set. For compliance with existing applications not using SSL the verifyServerCertificate property is set to 'false'. You need either to explicitly disable SSL by setting useSSL=false, or set useSSL=true and provide truststore for server certificate verification.


This can be avoided for development purposes by not using SSL. For this the JDBC url for the database should be appended with "useSSL=false". But it cannot be appended with a & sign like in a normal URL. Use the following format. If not it may give xml parsing errors.


Then it will work as usual.